0.はじめに
タイトル通り,動画からオブジェクト検知,トラッキングを行う方法について解説します.基本的に,動画を扱う機械学習をend-to-endで訓練させることは計算リソースやメモリの観点からだいぶ厳しいため,公開されている事前学習済みモデルをタスクに流用することになります.ですから,モデルの中身がわかっていなくてもコードを動かせばオブジェクト検知を実装すること自体はとても簡単です.
今回は,YouTubeのこちらの動画:
からオブジェクト検知・トラッキングを実施していきます.使う手法はYOLOv3,SORTです.
1.準備
1.1 ColabをDriveにマウント
手軽にGPUを使えるGoogle Colaboratoryを使用します.動画を読み込んだり保存したりするためには,ColabがDriveにマウントされている必要があります.以下の呪文を唱えましょう.
from google.colab import drive
drive.mount('/content/drive')
1.2 Git Hubから事前学習済みモデルをクローン
今回は,こちらのリポジトリをクローンして使います.notebookによる解説も載っていてとてもわかりやすいです.
import os
os.chdir('/content/drive/My Drive/任意のパス')
!git clone https://github.com/cfotache/pytorch_objectdetecttrack.git
またモデルの学習ずみweightを公式サイトに従ってロードします.サイト中段の"Easy! You already have the config file for YOLO~"のあたりの"here"をクリックしてファイルをダウンロードし,Driveのconfigフォルダに手動でアップロードする,という形でも構いません.これでモデルを使用する準備ができました.
2 画像からオブジェクト検知(YOLOv3)
2.1 オブジェクト検知の関数を用意
まずは,画像からオブジェクトを検知してみましょう.オブジェクト検知用の関数detect_imageを定義します.detect_image内のmodelはYOLOアルゴリズムを用いています.YOLOは画像の領域推定と分類をいっぺんにCNNで処理する手法で,処理が速いことが特徴です.
config_path='config/yolov3.cfg'
weights_path='config/yolov3.weights'
class_path='config/coco.names'
img_size=416
conf_thres=0.8
nms_thres=0.4
# Load model and weights
model = Darknet(config_path, img_size=img_size)
model.load_weights(weights_path)
model.cuda()
model.eval()
classes = utils.load_classes(class_path)
Tensor = torch.cuda.FloatTensor

def detect_image(img):
  # scale and pad image
  ratio = min(img_size/img.size[0], img_size/img.size[1])
  imw = round(img.size[0] * ratio)
  imh = round(img.size[1] * ratio)
  img_transforms = transforms.Compose([ transforms.Resize((imh, imw)),
         transforms.Pad((max(int((imh-imw)/2),0), max(int((imw-imh)/2),0), max(int((imh-imw)/2),0), max(int((imw-imh)/2),0)),
                        (128,128,128)),
         transforms.ToTensor(),
         ])
    # convert image to Tensor
    image_tensor = img_transforms(img).float()
    image_tensor = image_tensor.unsqueeze_(0)
    input_img = image_tensor.type(Tensor)
    # run inference on the model and get detections
    with torch.no_grad():
        detections = model(input_img)
        detections = utils.non_max_suppression(detections, 80, conf_thres, nms_thres)
    return detections[0]
detect_image関数は,任意のサイズのPIL画像を入力とします.出力は,オブジェクトの座標をx1,y1,x2,y2とし,それがオブジェクトである確率をp_obj,各クラスに属する確率をp_1,p_2…とすると,次のような形状のテンソルを返します.関数の内部でごちゃごちゃやってるのは画像をモデルの入力とするための前処理です.
[[x1,y1,x2,y2,p_obj,p_1,p_2,p_3,...],
 [x1,y1,x2,y2,p_obj,p_1,p_2,p_3,...],
 ...                ]
2.2 オブジェクト検知を実行
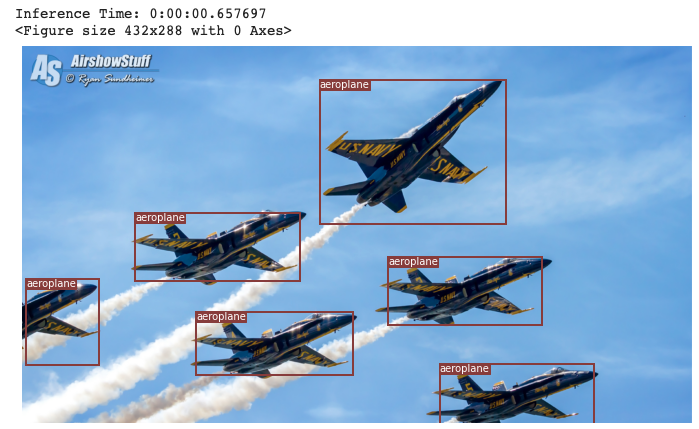
それでは画像のオブジェクト検知をやってみましょう.notebookの写経をすればできます.
!pip install Pillow
# load image and get detections
img_path = "images/blueangels.jpg"
prev_time = time.time()
img = Image.open(img_path)
detections = detect_image(img)
inference_time = datetime.timedelta(seconds=time.time() - prev_time)
print ('Inference Time: %s' % (inference_time))
# Get bounding-box colors
cmap = plt.get_cmap('tab20b')
colors = [cmap(i) for i in np.linspace(0, 1, 20)]
img = np.array(img)
plt.figure()
fig, ax = plt.subplots(1, figsize=(12,9))
ax.imshow(img)
pad_x = max(img.shape[0] - img.shape[1], 0) * (img_size / max(img.shape))
pad_y = max(img.shape[1] - img.shape[0], 0) * (img_size / max(img.shape))
unpad_h = img_size - pad_y
unpad_w = img_size - pad_x
if detections is not None:
    unique_labels = detections[:, -1].cpu().unique()
    n_cls_preds = len(unique_labels)
    bbox_colors = random.sample(colors, n_cls_preds)
    # browse detections and draw bounding boxes
    for x1, y1, x2, y2, conf, cls_conf, cls_pred in detections:
        box_h = ((y2 - y1) / unpad_h) * img.shape[0]
        box_w = ((x2 - x1) / unpad_w) * img.shape[1]
        y1 = ((y1 - pad_y // 2) / unpad_h) * img.shape[0]
        x1 = ((x1 - pad_x // 2) / unpad_w) * img.shape[1]
        color = bbox_colors[int(np.where(
             unique_labels == int(cls_pred))[0])]
        bbox = patches.Rectangle((x1, y1), box_w, box_h,
             linewidth=2, edgecolor=color, facecolor='none')
        ax.add_patch(bbox)
        plt.text(x1, y1, s=classes[int(cls_pred)],
                color='white', verticalalignment='top',
                bbox={'color': color, 'pad': 0})
plt.axis('off')
# save image
plt.savefig(img_path.replace(".jpg", "-det.jpg"),
                  bbox_inches='tight', pad_inches=0.0)
plt.show()

うまく飛行機を検知できましたね.次は動画からトラッキングを行います.
3. 画像からオブジェクト検知,トラッキング(YOLOv3,SORT)
3.1 YouTubeDLで動画を取得
YouTubeDLを使って,URLを入力として動画を保存していきます.
!pip install youtube-dl
import youtube_dl

url = 'https://www.youtube.com/watch?v=knCzRKQJygc'
baseball_path = '/content/drive/My Drive/任意のパス/baseball'
baseball_video_path = os.path.join(baseball_path, 'video.mp4')
if not os.path.exists(baseball_path):
  os.mkdir(baseball_path)
vdl_opts = {'outtmpl':baseball_video_path, 'format':'bestvideo'}
vdl = youtube_dl.YoutubeDL(vdl_opts)
vdl.extract_info(url)
Driveのbaseballというフォルダにvideo.mp4という名前の動画ファイルが入っていたら成功です.
3.2 動画をフレームに分割
「動画」とは,「画像を並べたもの」です.Pythonで動画から画像を切り出す方法にはOpenCVかffmpegがありますが,ここではffmpegを使います.今回は,動画のうち紅林選手と吉田正尚選手が好守している132秒~167秒の区間を用いることとします.
baseball_img_path = os.path.join(baseball_path, 'img')
if not os.path.exists(baseball_img_path):
  os.mkdir(baseball_img_path)
!ffmpeg -i '$baseball_video_path' -vf trim=132:167,setpts=PTS-STARTPTS '$baseball_img_path/%04d.jpg'
baseball_img_pathに画像が保存されていれば成功です.
3.3トラッキング
sortフォルダにはトラッキング用の関数Sortが入っています.Sortはdetect_imageの出力テンソルを入力とし,出力はオブジェクトの座標とid,クラスで,出力テンソルの形状は
[[x1,y1,x2,y2,obj_id,cls_pred],
 [x1,y1,x2,y2,obj_id,cls_pred],
 ...                           ]
です.これを実装すると,次のようになります.
import cv2
import subprocess
from sort import *

mot_tracker = Sort()
cmap = plt.get_cmap('tab20b')
colors = [cmap(i)[:3] for i in np.linspace(0, 1, 20)]
for img_path in os.listdir(baseball_img_path):
  frame = cv2.imread(os.path.join(baseball_img_path, img_path))
  frame = cv2.cvtColor(frame, cv2.COLOR_BGR2RGB)
  pilimg = Image.fromarray(frame)
  detections = detect_image(pilimg)
  img = np.array(pilimg)
  pad_x = max(img.shape[0] - img.shape[1], 0) * (img_size / max(img.shape))
  pad_y = max(img.shape[1] - img.shape[0], 0) * (img_size / max(img.shape))
  unpad_h = img_size - pad_y
  unpad_w = img_size - pad_x
  if detections is not None:
    tracked_objects = mot_tracker.update(detections.cpu())
    unique_labels = detections[:, -1].cpu().unique()
    n_cls_preds = len(unique_labels)
    for x1, y1, x2, y2, obj_id, cls_pred in tracked_objects:
      box_h = int(((y2 - y1) / unpad_h) * img.shape[0])
      box_w = int(((x2 - x1) / unpad_w) * img.shape[1])
      y1 = int(((y1 - pad_y // 2) / unpad_h) * img.shape[0])
      x1 = int(((x1 - pad_x // 2) / unpad_w) * img.shape[1])
      color = colors[int(obj_id) % len(colors)]
      color = [i * 255 for i in color]
      cls = classes[int(cls_pred)]
      cv2.rectangle(frame, (x1, y1), (x1+box_w, y1+box_h), color, 4)
      cv2.rectangle(frame, (x1, y1-35), (x1+len(cls)*19+60, y1), color, -1)
      cv2.putText(frame, cls + "-" + str(int(obj_id)), (x1, y1 - 10), cv2.FONT_HERSHEY_SIMPLEX, 1, (255,255,255), 3)

  frame = cv2.cvtColor(frame.astype(np.float32), cv2.COLOR_RGB2BGR)
  cv2.imwrite(os.path.join(baseball_img_path, img_path), frame)
これでDriveのbaseball_img_pathにオブジェクト検知,トラッキングの結果が描画された画像が保存されます.最後に画像を繋げて動画にします.
!ffmpeg -r 30 -i '$baseball_img_path/%04d.jpg' -vcodec libx264 -pix_fmt yuv420p -r 30 '$baseball_video_path'
4.最後に
以上の手順によって,このように動画からオブジェクト検知とトラッキングをすることができました.最初からモデルを構築しなくて良くて楽ですね.
今回はコードを全て載せることでYOLOとか全く分からないよって人でも好きな動画でオブジェクト検知,トラッキングが実行できるよう解説しました.興味を持った方は技術の内容も勉強してみてください.